| View previous topic :: View next topic |
| Author |
Message |
trev
Jedi Master


Joined: 02 Feb 2006
Posts: 311
Location: Ireland
|
 Posted: Fri Feb 10, 2012 12:42 am Post subject: |
 |
|
thanks for the tips/comments fellas 
engine and gearbox bolted up, hopefully for the last time! Still have to fill fluids and fit the oil filter on the engine.

I was just about to panel beat the fuel tank bulkhead (left) back into shape and remove the carbon canister bracket as it's no longer needed and in the way when I remembered I had a very nice, very straight spare bulkhead (right) in the loft! With no bracket to cut off! Saved me a bit of work

cleaned, primed and painted the engine subframe:
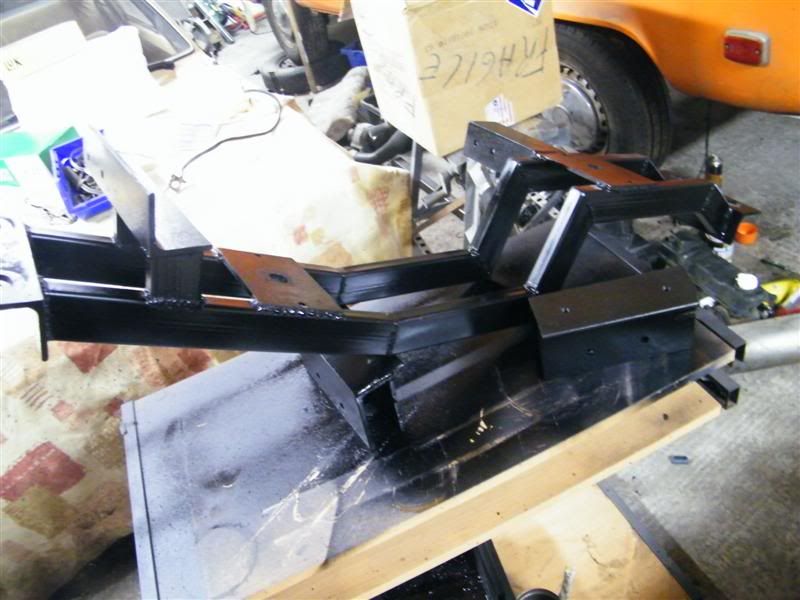
and sealed the tank. This is a tank from a 2 litre fuel injected bus, it has the second nozzle for the fuel return line, which I needed for the diesel return. I got it for free as it had been repaired and couldn't be guaranteed. I sealed it up with fibreglass resin. Hopefully it'll do the job

I also undersealed the "roof" over the gearbox area and the battery tray I welded.
Getting there!!! If the resin has set and the tank is sealed properly when I test it tomorrow then the engine and gearbox will be in place by the weekend! |
|
| Back to top |
|
 |
trev
Jedi Master
Joined: 02 Feb 2006
Posts: 311
Location: Ireland
|
| Posted: Sat Feb 11, 2012 1:09 am Post subject: |
|
|
I checked the fibreglass resin this morning before heading out to work and it was still wet/soft so after work I called into the motor factors and bought some new resin. The stuff I used that didn't set had been on the shelf for almost 7 years!! I wiped off the old shite, slathered on some of the new stuff around 6ish, by the time I got back to the garage at 10 it was rock hard!! I tested the tank for leaks and she's holding tight so after draining it and drying it out, it was fitted to the van, plumbed in for the breather pipes and filler neck, fuel level sender plugged in, tank clamped down, the satin black painted bulkhead panel fitted and the van was finally ready to fit the engine!
Between the electric hoist and the jack I managed to get the engine and gearbox assembly in place without incurring any injuries!. I've left out the middle engine hanger, the gearbox nosecone and the new subframe I built are all that's supporting the engine. I'll see how well it works out...
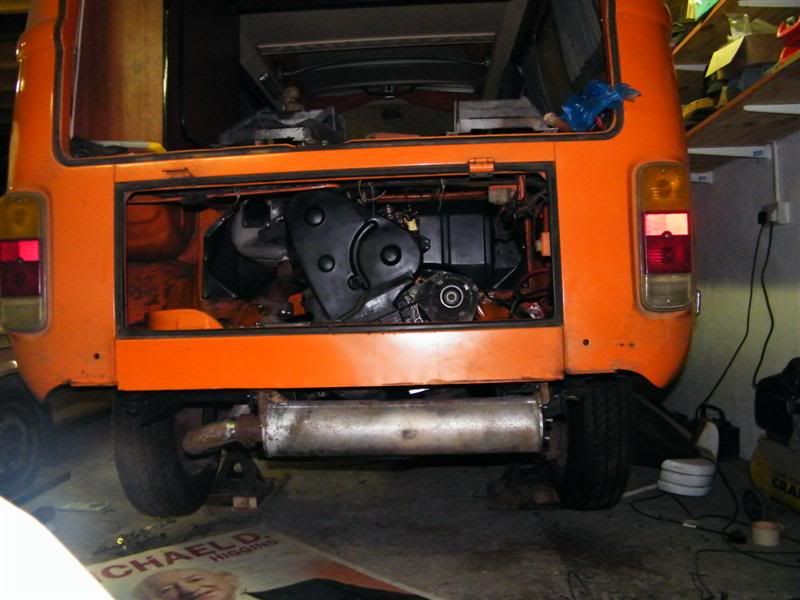
and here you can see how the relocation of the filler cap worked out. Nice

so a productive evening all in. There are dozens of small jobs left to do and I have yet to work out the mounting and ducting of the radiator under the van but it' a good bit closer to finished now than it was yesterday!! |
|
| Back to top |
|
|
trev
Jedi Master
Joined: 02 Feb 2006
Posts: 311
Location: Ireland
|
| Posted: Mon Feb 13, 2012 1:21 am Post subject: |
|
|
now that the engine is in place I'm "populating" the engine bay, fitting all the ancillary stuff needed to run the engine. As per my plans, I'm trying not to modify the van itself at all with the conversion and as such I've mounted the header tank and fuel filter on the bulkhead using the brackets they came on in the donor car.

I had a choice of three airboxes to use: B4 Passat, Vento and mk1 Toledo and after a bit of jiggery pokery I reckon the B4 Passat one is the best fit with the outlet pipe heading in the most favourable direction. I have to make up a strap to secure it in the second battery tray but it's right at home there, even the stock air hose reaches it!

so on to the radiator: as mentioned waaay back, it's a type25 diesel radiator and it squeezes nicely between the chassis rails. I have plugged in some hoses just to help me visualise where the pipes need to go but they're on the same side as the hoses come off the engine so it's a fairly straight shot between the engine and rad. I'm not going to bother with a heater at the moment, just to keep things simple during the build. Once everything has been proven I'll figure out how to plumb in a heater then.

the plan is to bend up some copper pipe (I have plenty spare after some recent home improvements!) to cross over the top of the torsion bar housing. I have to do a bit of research first though as I think I read somewhere that copper pipes don't work well with aluminium heads, there's some kind of electrolytic reaction or something. If I can't use copper I'll work something else out. Maybe plastic...
 |
|
| Back to top |
|
|
splitbusvanatic
Jedi Master
Joined: 08 Oct 2006
Posts: 330
Location: Co. Mayo, Ireland
|
| Posted: Mon Feb 13, 2012 12:22 pm Post subject: |
|
|
Hi Trev,
you moving along nicely.
Maybe get some stasndard plastic pipes from a scrapped watercooled T25,
they're bullet proof and well long enough, remember they go from front of t25 way back to engine.
they might bend a little with heat.
with a few 90 degree silicone bends or whatever, you'll be flying. |
|
| Back to top |
|
|
madmatt
Force Sensitive

Joined: 17 Oct 2008
Posts: 23
|
| Posted: Tue Feb 14, 2012 10:03 am Post subject: |
|
|
| think the issue with dissimular corrosion in the water system can be minimized by using the right antifreeze,would suggest you go for a vw g12 spec antifreeze. |
|
| Back to top |
|
|
althesparky
Force Sensitive
Joined: 12 Sep 2011
Posts: 19
|
| Posted: Tue Feb 14, 2012 10:31 am Post subject: |
|
|
| I brought a couple of lengths of 32mm alloy pipe and a handfull of silicon elbows, 45's etc etc from eBay .... Job done |
|
| Back to top |
|
|
13 window deluxe
Jedi Guardian


Joined: 22 Dec 2006
Posts: 861
Location: chesterfield derbyshire
|
| Posted: Tue Feb 14, 2012 1:58 pm Post subject: |
|
|
my tdi split and old tdi late bay both used 32mm mdpe polypipe (the blue stuff used at shows for water stand pipes) but i used waste pipe as its black so blended in better it's good stuff as it bends round crossmembers and no chance of corrosion internally etc i would recommend sliding a insert into the end where the hose clip grips 
_________________
1964 rat 13 window deluxe 1Z tdi,
1975 rhd twin slider tintop (TBA)
1991 golf 2 gti with tweaked AHU tdi,
previous tdi swaps: gone but not forgotten
1979 rhd twin slider tintop bay ahu 1.9tdi
1990 T25 1Z 1.9tdi
1993 suzuki samurai with 1Z 1.9tdi |
|
| Back to top |
|
|
trev
Jedi Master
Joined: 02 Feb 2006
Posts: 311
Location: Ireland
|
| Posted: Tue Feb 14, 2012 2:47 pm Post subject: |
|
|
is the mdpe polypipe the kind of stuff you'd get at a builder's providers?
I priced up the Gates "green stripe" reinforced rubber hose at the motor factors yesterday: €70 for a 5 foot length!!! It looks like it would do the job nicely but f**K!! the price of it!
the cheaper rubber corrugated hose is around €30 for a 4" length. I don't like the look of it though, it really looks like a DIY bodge.
I've been thinking about "qualpex" household water piping from the local builder's providers but the biggest it comes in is 28mm internal. Would that be big enough? It's around €35 for a 6M length but doesn't seem to like tight bends and can't be heated to shape it. |
|
| Back to top |
|
|
trev
Jedi Master
Joined: 02 Feb 2006
Posts: 311
Location: Ireland
|
| Posted: Fri Feb 17, 2012 1:00 am Post subject: |
|
|
this was a LOT of work for a subtle modification...


four hours in total! |
|
| Back to top |
|
|
jp
Darth Admin


Joined: 09 Nov 2005
Posts: 1984
Location: Chippenham, Wiltshire
|
| Posted: Fri Feb 17, 2012 10:54 am Post subject: |
|
|
That is ace how did you do it? what gauge did you use.. step by step guide please 
Rev counter next then 
Last edited by jp on Fri Feb 17, 2012 12:06 pm; edited 1 time in total |
|
| Back to top |
|
|
trev
Jedi Master
Joined: 02 Feb 2006
Posts: 311
Location: Ireland
|
| Posted: Fri Feb 17, 2012 12:04 pm Post subject: |
|
|
the gauge is from a '73 Audi 80 but that's just cos it's what I had to hand. The temp gauges in all oldish VDO clusters that I've seen have all been modular, i.e. they're independent of the main cluster. Even the gauge unit out of a 52mm round gauge could be pirated.
The face of the speedo had to be measured carefully to get the right shaped "window" for the temp gauge. I measured the sweep of the window off the Audi clock face to be 55 degrees and then laid a piece of masking tape on the face of the speedo so I could draw on it with a biro. I left a few mm at the rim for strength and then took it up as tight to the km/h text. It was cut and tidied using a dremel and a needle file. I lost the VDO logo in the process but so what?!
The hardest part was mounting the small temp gauge to the backing plate of the gauge cluster and getting the offset right so the needle wouldn't catch on the back of the speedo face. I removed the face from the temp gauge, drilled a hole through the back of the housing, used skinny but longish bolt and packed it up or down with washers and a nut to get the offset to the backing plate right. Once everything was sitting nicely it was all tightened in place.
The poles on the temp gauge are too short to make it through the backing plate so I drilled another hole in the cluster backing plate, fed in two wires and used eyelet connectors on the ends of the wires, bolted down tight on the poles of the temp gauge.
It was a pig of a job, very fiddly but the end result is almost "factory" looking so I'm happy with it |
|
| Back to top |
|
|
jp
Darth Admin
Joined: 09 Nov 2005
Posts: 1984
Location: Chippenham, Wiltshire
|
| Posted: Fri Feb 17, 2012 12:31 pm Post subject: |
|
|
| Excellent stuff will def be looking to do something like this along with incorporating a Rev counter. I'll probably use the binnacle where you have a clock as I don't have such a luxury item . Cheers for the write up |
|
| Back to top |
|
|
|


 FAQ
 Search
 Memberlist
 Usergroups
 Register
 Profile
 Log in to check your private messages
 Log in


