| View previous topic :: View next topic |
| Author |
Message |
Cleverchap
Jedi Master


Joined: 08 Feb 2006
Posts: 356
Location: Middle of the Midlands
|
 Posted: Fri Apr 29, 2016 8:20 pm Post subject: Posted: Fri Apr 29, 2016 8:20 pm Post subject: |
 |
|
With the kombi on the roll over frame the grinder was released

The central belly pan had to go as the chassis cross beams were a little crusty to say the least.

With the belly pan and chassis cross beams removed I did some localised repairs to the main chassis rails and then got a mate to plasma cut some bits for me
Its bloody handy having a mate with full metal fabrication facilities.
Shameless plug for a good mate www.allmetalfabrication.co.uk 

Bit of metal sticking and they soon became

Which went in here

The central belly pan wont be going back on as I'll be running a centrally mounted radiator, and so I needed a way of getting the radiator hoses through the chassis rails.
With a little bending around a former a suitable tube was created


Welded in to the rear dog leg

Same again in the chassis

How the cooling hose will run down the right hand side

4 strengtheners were welded to the inside of the chassis rails down both sides to provide extra support. After final welding it was all taken back to bare metal and treated with Fertan which goes black during the curing process


After scraping this lot off the bottom of the tool chest area

it looked a whole lot cleaner

but some small repairs were needed

I even took time to weld up this holes rather than use a rubber grommet (as I would have done in the past)


With the front and rear cross chassis sections replaced with the 'waffle' sections you can see what I was trying to achieve.
 |
|
| Back to top |
|
 |
Cleverchap
Jedi Master
Joined: 08 Feb 2006
Posts: 356
Location: Middle of the Midlands
|
| Posted: Fri Apr 29, 2016 8:52 pm Post subject: |
|
|
Both left and right belly pans had to be removed as the left one was damaged and the return from the radiator would run under the right one so I needed access.
New belly pans were ordered but the fit was...... to be expected 


After a lot of buggering about, flattening out the panel returns cutting them to shape and re making the returns I was able to crack out the rivnut gun and fit the side belly pans.


Starting on the other side

A little side project was to build a suitable engine trolley/stand
A friend of a friend "salvaged" a small trolley that was being thrown away from a hospital where he was working.
A couple of plasma cut exhaust flanges (minus holes) were purchased and hey presto!!


The engine (and engine gearbox combo if required) sits comfortably and securely on the trolley and it spins in all directions, which is very handy when fitting the engine gearbox combo back in the kombi. The sump can be removed whilst on the trolley as can the oil filter and its just the right height for my oil catch pan to slide underneath.  |
|
| Back to top |
|
|
splitbusvanatic
Jedi Master
Joined: 08 Oct 2006
Posts: 330
Location: Co. Mayo, Ireland
|
| Posted: Sat Apr 30, 2016 10:18 am Post subject: |
|
|
Bloody hell.
Thread resurrection.
In the very best way.
Great to have you back brother.
Nice to see you didn't forget the old girl although she must've been pretty lonely in that carport in Coventry. As you can see. We are still bodging here.
Looking forward to your updates. |
|
| Back to top |
|
|
Cleverchap
Jedi Master
Joined: 08 Feb 2006
Posts: 356
Location: Middle of the Midlands
|
| Posted: Sat Apr 30, 2016 8:36 pm Post subject: |
|
|
| Cheers mate. Plenty of updates to post, I've been rather busy over the last few months |
|
| Back to top |
|
|
Cleverchap
Jedi Master
Joined: 08 Feb 2006
Posts: 356
Location: Middle of the Midlands
|
| Posted: Sat Apr 30, 2016 9:10 pm Post subject: |
|
|
With the chassis repairs completed and the belly pans fitted up, next on the list was a new radiator set up. Over the years it seems that one of teh most reliable set ups for kombis is having the rad in between the chassis rails, so this is what I went for.
Whilst in NZ I did a whole heap of internet research and came across a couple of pics of what I wanted. Just down the road from where I now live is a radiator fabricators and it turns out the guy that owns it knows my Mum and Dad from years gone so we came up with a price and he got cracking. A week later he dropped this off.


As big as I could squeeze in between the chassis rails and as thin as he could make it to give very good flow.

The deep mouth of the scoop is yet to be tested but it may need to be reduced. I'll see how things go once I start driving the kombi on the road.
Mounted up
 |
|
| Back to top |
|
|
Cleverchap
Jedi Master
Joined: 08 Feb 2006
Posts: 356
Location: Middle of the Midlands
|
| Posted: Sat Apr 30, 2016 9:26 pm Post subject: |
|
|
Side project #2 was to match all the locks to just one key.
This is something that had bugged me ever since I bought the kombi back in 2003!!
All the locks came apart nice and easily, so I just had to match them all to the ignition barrel.


I very tedious job that takes a while, especially when you need to clean all the grease and muck off every lock 'wafer' and tiny spring in the lock barrel but I got there in the end.
 |
|
| Back to top |
|
|
Cleverchap
Jedi Master
Joined: 08 Feb 2006
Posts: 356
Location: Middle of the Midlands
|
| Posted: Sun May 01, 2016 9:37 pm Post subject: |
|
|
To break up all the welding, grinding and chassis work (and to let some of my my welding burns heal up) I started to take a look at the scooby box.

Open it up and see what we've got

Pinion shaft gear set and diff removed, so I could change to the Subagears versions

The case is so much easier to pick up like this


The main issue with fitting the Subagears is flipping the diff in the case. A fair bit of grinding was need to provide clearance but i got there in the end.


Then it was on to swapping over the pinion shaft

Very straight forward but I know of a few people that have had some problems with the Subaspool not fitting easily. Thankfully mine dropped straight into place 
Win some and lose some; sadly I had some serious issues when it came to fitting the Subanose. It fitted (poorly) and I couldn't get any gears. A few emails later and the damn thing still wouldn't select gears so it got thrown in the corner. Inside were some tell tale marks of a crap casting. 


This was with the detent removed, so god only knows how far out the casting is.
In the end I gave up on trying to get the Subanose to work and cut down my original Subaru nose cone. Bingo!!! All gears and no cocking about. I had Seb from www.allmetalfabrication.com ali weld the nose cone where required and that was that
 |
|
| Back to top |
|
|
Cleverchap
Jedi Master
Joined: 08 Feb 2006
Posts: 356
Location: Middle of the Midlands
|
| Posted: Mon May 02, 2016 2:05 pm Post subject: |
|
|
I got some clutch release bearing clips from the local Subaru dealer. Very nice lady on the parts desk and was happy to do a search for the parts so long as I didnt mind waiting, so no need for a registration number or chassis number.
24hrs later and the clips had arrived along with a new release arm.


With that together and a new clutch and pressure plate fitted it was time to marry the engine and gearbox whilst making full use of the engine trolly I'd made previously.

Whilst all this work was going on at the unit, I had been in touch with Adrian at Boxwagen. I wanted a new front beam built to some very unique specifications.
He listened to what I wanted and a couple of weeks after placing my order this arrived

Now to many people that just looks like a normal beam, but you might begin to notice whats missing. 
A set of THause flipped spindles and reversed ball joint arms were sourced as well as Gaz coil overs

And with it all bolted together looks something like this
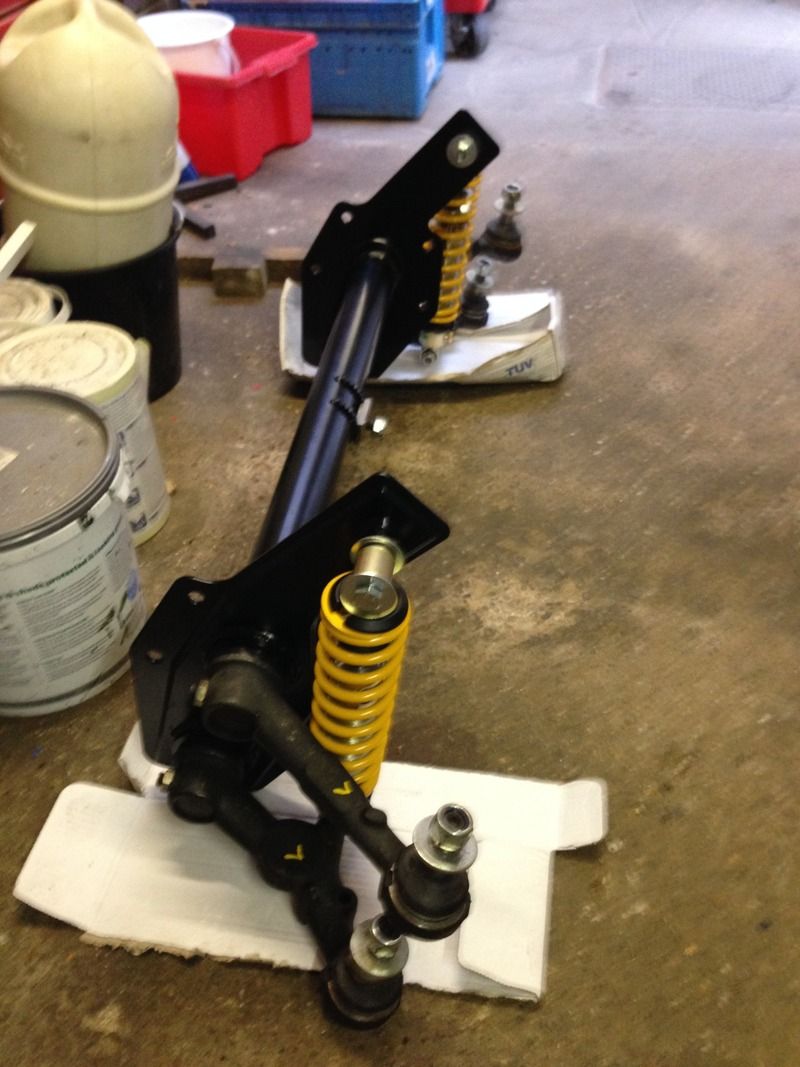

I have looked at several posts on line regarding coil overs running out of line on narrowed beams and in one case this resulted in the damper rod shearing. I have spoken with Red9Design as they sell top shock mounts which bring everything back in to line again. A pair are on order
Anyone spotted whats missing yet? 
Whilst the front end was starting to come together the local machinist was busy turning bloody great lumps of ali into swarf. Eventually I got a box of stuff back which allowed my hubs and huge calipars to bolt on to the new dropped spindles.
 |
|
| Back to top |
|
|
richbaker78
Teacher of Padawans


Joined: 31 Jan 2006
Posts: 1298
|
| Posted: Mon May 02, 2016 6:55 pm Post subject: |
|
|
Great to see you back on here and turning out some great work. Looks like you'll be finished before me. So when is the turbo engine arriving be a shame not to make full use of those brakes.
Interesting what you said about subanose mine fitted ok but I found the shift rod so tight it wouldn't move I have to sand all the zinc passivite off it ! |
|
| Back to top |
|
|
Cleverchap
Jedi Master
Joined: 08 Feb 2006
Posts: 356
Location: Middle of the Midlands
|
| Posted: Mon May 02, 2016 9:42 pm Post subject: |
|
|
| Hey bro. How did you go with your gear shift? I initially tried the steering shaft option but it wouldnt work for me so I have done something a little different |
|
| Back to top |
|
|
Cleverchap
Jedi Master
Joined: 08 Feb 2006
Posts: 356
Location: Middle of the Midlands
|
| Posted: Tue May 03, 2016 10:29 pm Post subject: |
|
|
With everything else done (kind of) it was time to approach the elephant in the room. And its a mother of an elephant and the entire reason why I'd started at the front of the kombi and worked my way backwards.
Anyone remember this photo?

Yep, rear chassis replacement time. 
Now I'm not the sort of bloke to shy away from stuff (as can be seen from my previous ramblings) but this particular job sent a few shivers down my spine.
Having discussed replacing this part of the chassis with several very reputable Midlands bases VW restoration companies they all sucked large volumes of air thru gritted teeth. So it'll be a straightforward job then....? Err no.
I needed to get this little bit of metal welded in absolutely bang on, first time and make sure it wasn't going to come out. And if I was making sure it wasn't coming out, it had to bang on right.
In all my other work, if things weren't quite right I could just redo it. With this...... well not so much.
And have you seen the price of split kombi parts these days? They have risen considerably in the years I have been overseas and this little slice of VW'ness cost me the very thick end of a couple of weeks wages (if I had a job) so that was another reason not to cock it up.
With the pressure mounting and my brain not coming up with any sensible ideas on how to progress I decided to do something different and spend even more money. I knew I wanted IRS so a late night punt on eBay and 2 days later this arrived on a pallet

The arse end of a 912 to be precise. I could have bought several of these for the price of the split kombi one 
It was stripped of its useful bits and the arms sent for powdercoating.
Conveniently the torsion beam can be stripped right down so it was light and easy to handle.

Cleaned up so I can take some measurements


In the end LOTS of measurements were taken of the a-arm mounts and then the grinder was put to work

After a bit of flap wheel action the a-arm mounts looked almost new

Now I needed to transfer them on to the split torsion tube.
Well not just yet, because that required a bit of similar treatment......
First off, the frame horns were removed, as carefully as possible because I had a queue of people beating a path to my door to buy them off me.

Then I needed to get the measuring stick out again and narrow the split kombi torsion tube 7 inches. I always wonder why when talking about VW's which we all know are metric cars, narrowing and ride height are discussed in inches. My guess is the American influence....?

Careful cutting

Slitting disc round where I wanted to narrow up to. Being careful to only go thru the outer layer of tube

Then out with the drill to remove the (massive) plug welds.

And finally slide off the unwanted tube

Reattach this bit back on to the torsion tube with some careful measuring to ensure its square. FYI I did fully seam welded all the way round the joint.

Easy at that, now onto fitting the a-arm mounts


Measure, tack, re measure, weld, you get the idea

useful 'end' of an old a-arm used to ensure the mounts were in the correct place

after not very long


Check to see if things fit


JUST!!

So now to fit it int the rear of the kombi......   |
|
| Back to top |
|
|
1303Steve
Jedi Knight


Joined: 07 Aug 2009
Posts: 208
Location: Sydney, Australia
|
| Posted: Fri May 06, 2016 4:58 am Post subject: |
|
|
Great work on this bus, I think the rear end you bought is from a 924 which is very similar to an early 944, the 924 had Beetle style drums where the 944 had discs
_________________
STI powered 1303 now running
G50 box, Boxster/944 brakes, Adaptronic 1280E ecu, PWR intercooler etc |
|
| Back to top |
|
|
|


 FAQ
FAQ Search
 Memberlist
 Usergroups
 Register
 Profile
 Log in to check your private messages
 Log in


